Saturday 31 March 2018

Craftwork card.

Hi there on this Easter Saturday. It's raining here, so not a good start to the weekend so far. Today's card is made mainly from craftwork card products, the flowers are part of a die set from sweet dixie and the rest is from my stash...
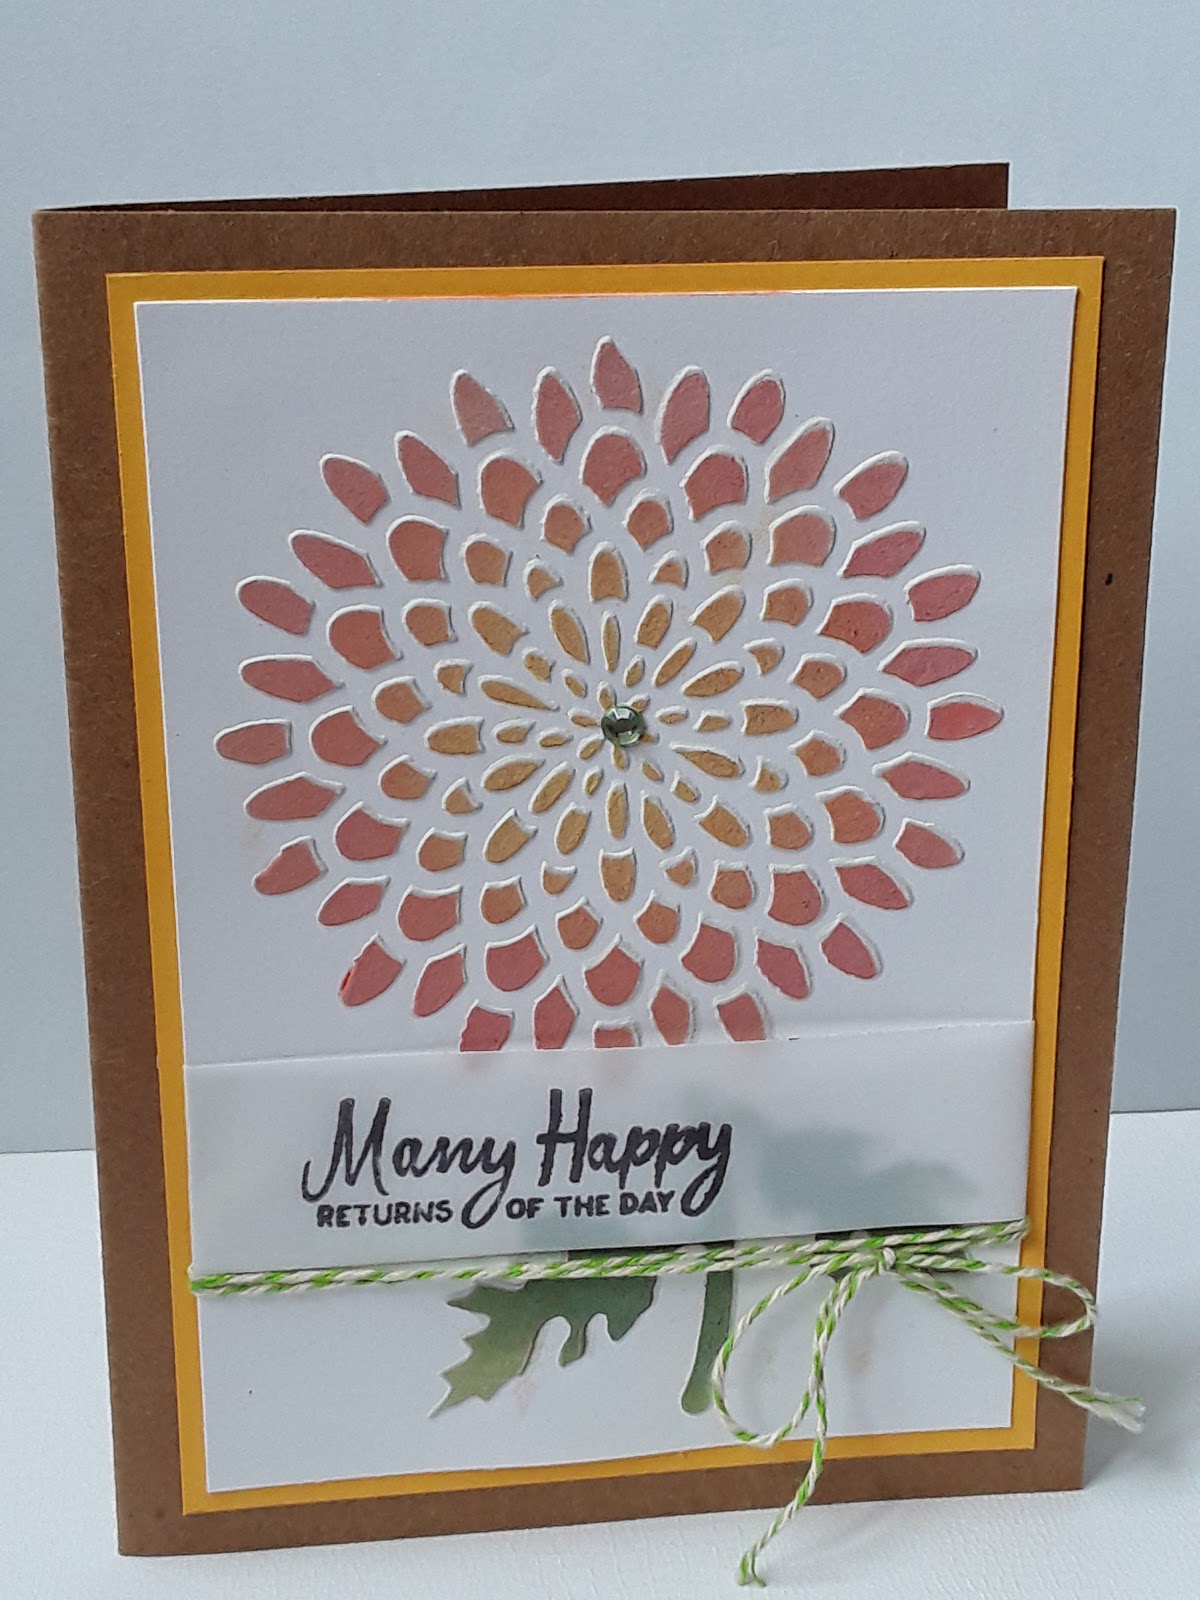
I started by cutting a 14x14in piece of craftwork card paper to fit onto my scallop card. I inked the edges and adhered to my card with cosmic. I layed all my elements onto my background paper, choosing a topper, then arranged more elements on top, adding flowers, candy, flower stymens and gems then adhere onto my card...I have another project next time using craftwork card products.
Please leave a comment if you wish and happy crafting
Love
Sharon
    X


Friday 30 March 2018

Easter card.

Hi there on this Happy Good Friday. I hope you are enjoying your Easter celebrations...here is my card for today.....


 The main die is part of a set from the spring orchard collection from couture
  By create and craft. I coloured it in with promarkers.
This centre die is from sue Wilson's canadian collection-montreal, the flower die is from from sweet dixie- pretty petals. I put candy in every centre, decorated with coloured pearls and used a silver peel off for the sentiment.

Love Sharon x 

Thursday 29 March 2018

Fathers day card.

Hi there on this Thursday Morning. I hope you are well and enjoying your day. I thought I'd share this quick father's day card with you today featuring a do crafts train topper sheet, paper from K&Company,  black card , Kraft card, distress green ink and black archival ink for the sentiment ....


First for all I backed a piece of black card on to my base card. I cut a piece of the map of the world
Paper to size and adhered it to left hand side of my card. I selected two toppers from theTopper sheet and backed them onto Kraft card. I arranged them onto my card along withThe inked up sentiment and adhered with foam pads to raise the project.
I hope I have inspired you.
Please leave a comment if you wish and happy crafting
Love
Sharon
    X

Wednesday 28 March 2018

Friend.

Hi there on this Wednesday morning. I hope you are well and enjoying your day so far. Today I have a simple but effective card to  share with you.. The card base is from a set of dies from tonic studio's ( grand gala bunting set ) it makes this smashing little card shape. I used the same die to cover the card front with patterned paper. The yellow card was cut from the double stitched rectangles and fitted perfectly across my card, the circle is from one of Linda Chapman's die collections and the decoupage was from a reddy sheet. To finish I added glossy accents to the flowers and a sentiment from my stash. I hope I have inspired you too.. I shall no doubt be using this die again in more of my projects.
Thanks for your comments everybody. I love to hear from you.
Please check back for more inspiration and happy crafting
Love
Sharon
   X


Monday 26 March 2018

Floral card.

Hi there on this Sunny Monday morning. I hope you are well and enjoying this lovely spring weather. I'm feeling that maybe spring as sprung a little, so this calls for a spring inspired  floral card today....I have gone all butterflies and flowers and picked shades of purple for my colour scheme.. I thought it would be easier to share this card by taking lots of photos so you can see the finished card close up...
please leave a comment if you wish and happy crafting!!!
Love
Sharon
    X


Saturday 24 March 2018

Friendship is a sheltering tree.

Hi there on this Saturday morning. I hope you are well and having a nice weekend so for. I must show you this card i made at the craft class i go to. This tree stamp is such a good stamp to have and works well for both male and female cards ( I believe this stamp is from stampin up ) I thought it was a good idea to stamp the leaves with multiple cotton wool buds taped together the colours suit the overall card design and the button and sentiment finish it off so well.
Please leave a comment if you wish and happy crafting
Love
Sharon
    X

Friday 23 March 2018

Fathers day card.

Hi there on this Friday evening. I hope you are well and looking forward to the weekend. I thought I'd share another male card with you today...two in a row it can't be bad.
I started by applying alcohol inks onto a piece of cream music note card. I spritzed a little water onto the card then dabbed it with kitchen roll to take the remainder off.
With my prepared background i measured and cut all my pieces out and backed them onto black card, including the stamped sentiment then i assembled the card together, along with the clock and music note die pieces. I plan to give this to my father in law on fathers day.
Please leave a comment if you wish and happy crafting.
Love Sharon
       X


Tuesday 20 March 2018

Male cards

Hi there on this Tuesday morning. I hope you are well and enjoying your day. I thought I'd share a few quick cards with you today.... I must admit i don't make many cards for men. I usually have to go out and buy them at the last minute. I have made a promise to myself i must make more masculine cards. I wonder how long that will last!! Maybe I'll achieve it this year....watch this space.


                                        I thought it would be fun to put wiggle eyes on the
                                        glasses. The bakers twine and wooden button give the
                                        finishing touch.
                                                         
                                       The papers are from a mix and match design pad from                                                        craft sensations by grafix 'It's a men's world' I shall be                                                          using this pad again no doubt, it as some 
                                       lovely nautical papers in it for summer....
                                      Please leave a comment if you wish and happy crafting
                                      Love Sharon
                                               X                                       

Saturday 17 March 2018

Bouncing brayer technique

Hi there on this Saturday afternoon. I hope you are well and enjoying your weekend. I thought I'd share this technique that you don't see very often. When I first did this I really enjoyed it and eventually mastered the technique after a lot of bouncing. The backgrounds all look individual and are prefect for sunsets...
I started by loading my brayer up with ink, choosing one end of my brayer as my starting point ( in this case i started in the bottom right hand corner )  l rotated my card as I went, bouncing until all the white space on my card had been covered  ( if you prefer to leave more white space bounce less ) I have more backgrounds to share with you in future posts....
Please leave a comment if you wish and happy crafting!
Love Sharon
       X

Friday 16 March 2018

Jewelled flower card.

Hi there on this Friday morning. I thought I'd share this chloe inspired card with you today. I love all of Chloe's collection's and her cards are so blingy and beautiful...here is my take on a chloe card.
I matted and layered a piece of silver mirri board and then piece of checked card onto  8x8in card.
I stamped 8 of chloe's small jewelled flowers in aqua vellum and then 8 in white vellum in the other style of jewelled flower in the same set with a verasmark then heat embossed with snow blizzard wow embossing powder. I neatly cut them all out.
I adhered the flowers on top of one another with pinflair glue, twisting them slightly so has to see the other flower underneath then i arranged them onto my card. I adhered them down with foam pads to give the flowers diminish. I made a banner shape from white card and heat embossed happy birthday in the centre with snow blizzard. I took a quickie glue pen and also went round the edges and heat embossed with the snow blizzard. I tooked the banner under the wreath  and curved it to give it movement. I decorated a jewelled ribbon slider with aqua ribbon and put aqua gems in the centre's of the flowers.  I hope I have inspired you.
Please leave a comment if you wish and happy crafting
Love Sharon
       X


Tuesday 13 March 2018

Smile.

Hi there on this Tuesday afternoon. Today a thought I'd share two cards made from the resist technique.
I started with a piece of white card then inked my butterfly stamp up with versamark then stamped it onto the card so it made an impression. I took my drayer and rolled it backwards and forwards on to a multi coloured ink pad making sure my drayer was covered and then inked it onto my card, making a seemless blend across it. The versamark as acted as a resist and left the butterfly impression on the card. I then over stamped onto the butterfly impression, but slightly off set with versamark then  sprinkled mica powder over it and brushed the rest off. this give it a pearlesant look. I finished the cards by decorating with gems and a sentiments....
Please leave a comment if you wish and happy crafting.
  Love
Sharon
     X

Monday 12 March 2018

Meadow sweet.

Hi there on this Monday morning. I mentioned in a earlier post i would share this twist and fold pop up card with you. I actually made this card first then i progressed onto the mini album i shared with you in February. The range of papers and embellishments are from craft asylum and this one is called meadow sweet. I don't think they make this range any more which is a shame because I really liked it.
I plan to give this to my friend on her birthday and I have also made a card in the same papers... I hope I have inspired you.
Please leave a comment if you wish and happy crafting
Love
Sharon
    X


Saturday 10 March 2018

Embossed flower card.

Hi there on this Saturday morning. I thought I'd share this card i made at the craft class I regularly go to... I think this is a lovely stamp especially embossed in white, the background really makes the stamp pop off the page
Firstly I started by inking the background with various coloured inks then I stamped with versamark first and embossed with a white embossing powder then heated it to set. I took the Tim holtz mixed media die and cut it in the bottom right hand corner. I used a stencil to make a pattern in the other corners to give it texture. To finish I cut a a flag shape and stamped the sentiment on to it then backed onto deep purple card then onto my base card..
Please leave a comment if you wish and happy crafting!!
Love Sharon
        X


Thursday 8 March 2018

Chrysanthemum.

Hi there on this Thursday morning my card today is slightly mixed media, using modeling paste though a stencil....
I started by placing the stencil onto my white card, using a spatula of some sort. I carefully spread the paste though the stencil, checking i hadn't missed any of the design, if you happen to miss some of the design just fill it in with extra paste. I slowly took the stencil off, has not to disturb it to much, then washed the stencil under the tap, leave to air dry. (I give it over night to dry ) then i layed the stencil back over the design and inked though with several colours to give it a graduated look.
I took a stripe of vellum and stamped a sentiment to one side then folded it round the sides of the card. I then wrapped bakers twine round the card twice and tried with a bow.
With my finished topper ready I back it onto yellow card and then onto a Kraft base card...
Hope you like it.
Please leave a comment if you wish and happy crafting.
Love Sharon
       X


Tuesday 6 March 2018

Blossoms

Hi there on this Tuesday morning my card today is a quick and easy make, when i was working on the acrylic block card I shared with you on another post. I decided to experiment on other backgrounds for my cards and this is one of them.... it's quite dark in some area's and not in others so i have taken some close up photos so you can see the colouring better...
             Background /two colours of distress ink, spritz on a heat-proof Mat.
                                                 
                 Put base card face down onto ink and left off. Set to one side to
                 dry, stamp image/sentiment and colour with promarkers. Decorate
                 the centre's of the flowers with pink pearls.
                 Please leave a comment if you wish and happy crafting!!
                 Love Sharon
                         x
                                                   

Saturday 3 March 2018

acetate card

Hi there on this Saturday morning. I hope you are well and coping with this weather. I think we've had the worst of the snow round our parts, it's still cold but at least the biteing wind as dropped. let's hope we see some nice spring weather soon😊
I looked though my cards yesterday and decided to share a couple of quick makes i made at my craft class...
I used a piece of heat proof acetate and dotted alcohol ink and blending solution all over the rough side then i took a drinking straw and blew onto the ink so the ink dispersed all over to form a pattern... I cut an aperture out of a small card and placed the finished background behind the aperture and secured it with double sided tape. I put a square of card behind that to hind the back of it, so to make it look neater.
To finish I stamped a sentiment  and decorated with a few gems
Thanks for calling in and please leave a comment if you wish.
Love Sharon
X


Thursday 1 March 2018

Nature at it's best.

Hi there.  Its the first day of spring but you wouldn't think it was, when you see the terrible snowy conditions we are experiencing at the moment, the beast from the east as well and truly hit us, but looking on the positive side it can only get better.
Moving on I would like to share two quick and simple cards with you today.....
1/ The background is distress inks applied to get a seamless blend of colour and then spritzed with water to distress it
 2/ this background is a little different from the first. I applied the ink from off my matt, which I spritzed first.
3/ I used docrafts papermania urban stamps ( Folium and Entomologist ) and stamped the whole image in black ink. I backed my backgrounds onto black card then onto a 15 x10.5cm card (  the card on the left is a little smaller ) with a stamped sentiment
Please leave a comment if you wish and happy crafting!!
Love Sharon x