Wednesday 31 December 2014

Sepia rose card

Hi there, Happy new years day and wishing everybody the best for 2015 !!!
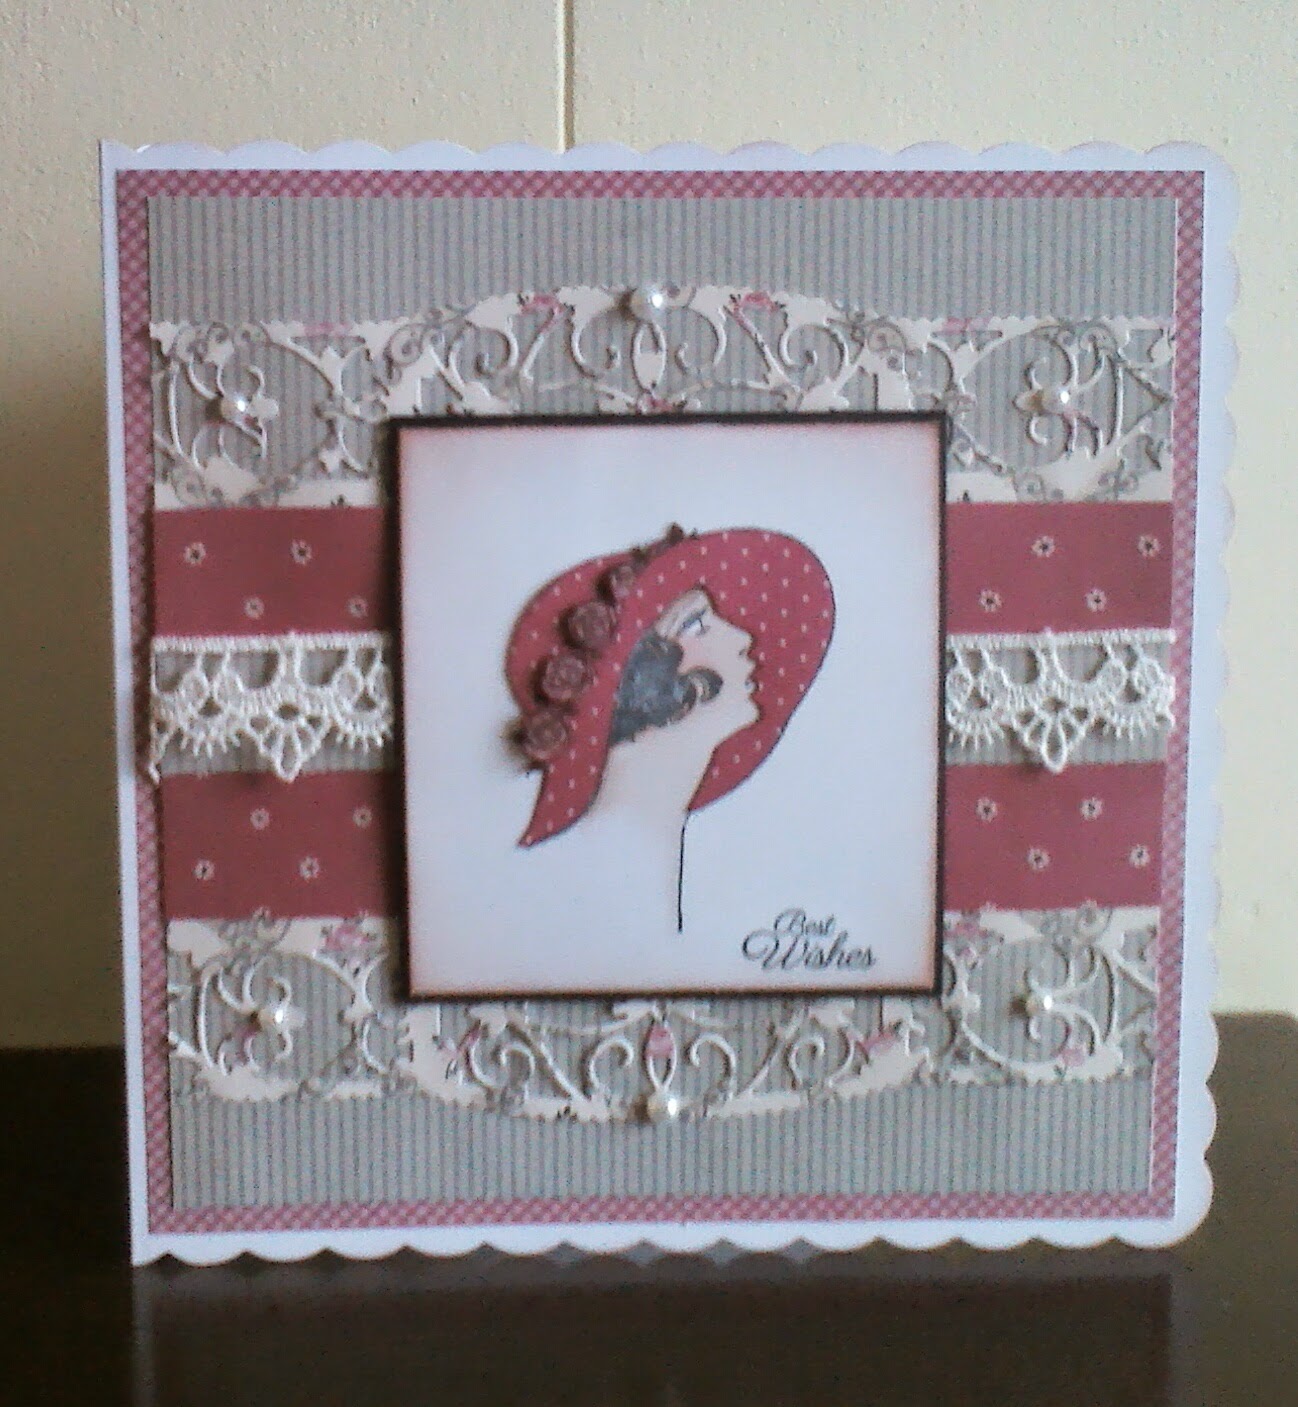
This next card was made with the square vines base affections die set and the first crush affections insert die.
I started with a 8x8 in square cream card blank I cut a aperture out of the front of it with the largest die in the set. I cut a piece of  copper mirri card 19x19cm square and embossed it, then with the affection die set I cut all the layers out, the heart in the centre is from the insert dies,I positioned all of my pieces on the inside of my card and stuck them down. I finished the card with a decoupage rose, a message and some pearls.
                        Thank you for stopping by and Happy Crafting
                                                     Love Sharon  xxx


Enchanted escape

  Hi there.Happy new years eve this is my last card of 2014 and i thought i would use the couture collection by create and craft, it as been a huge favourite of mine, all I have used is the corner dies to create this card.I didn't think it needed much more the dies show it off.
 I started with a piece of A4 pearlized card folded in half. I matted and layered a piece of silver mirri board, then white pearlized and purple card leaving different borders.I then postioned my die on to a piece of white glitter card centralizing the middle two corners first then the outer two.I attached this to my card with foam pads to give it some dimension and added pearls a very elegant card but hardly any work involved.
photo of card
this photo shows the detail on the dies.
Thank you for viewing this page feel free to leave a comment if you wish love Sharon.


Friday 26 December 2014

Swirly heart card.

Hi there.Happy boxing day, as i am typing this entry it is snowing outside in the uk. Just a day to late... This is a card I made with the free swirly heart embossing folder and stamp set on the front of this months Simple cards and papercraft.This card just shows what the embossing folder can produce,but the stamp is equally as nice.
I embossed the swirly heart in to a different pattern on to a piece of purple coordinations,stuck this on to my card leaving a border.Then I embossed again on to a piece of aqua card,I cut out the heart then stuck this on to my card with foam pads to give it height.I stuck the wooden birdcage inside the heart,embellished with die cut flowers and foliage to coordinate and added a thank you message.
Photo of card
Close up of card
Thank you for stopping by and happy crafting love Sharon xxx.

Thursday 18 December 2014

elegant lady.

Hello there,just a week to go before Christmas day.it seems a long time a go since I started making my first Christmas card,and now it's nearly arrived.Is everybody organized for Christmas. I'm nearly there, just the last minute buys,then I should be sorted l hope?
Moving away from Christmas this card was inspired by the millinery die collection from tonic studio's.I just love their products.

I started this card with 8x8in square scalloped edge card blank.inked around the edges with Victorian velvet distress ink.I matted and layered the patterned papers on to my card,the lace was added before i stuck the final pieces down.I stamped the image of the elegant lady on to white card stock,inked a round the edges with Victorian velvet distress ink, paper pieced the hat and used glossy accents on the roses to make them pop,the face was coloured in with pro markers.l backed this on to black card stock and placed it in the middle of my card and stuck it down with foam pads to give it height.Finally I embellished with pearls.

                                                           The finished card.

                      Thank you for stopping by and happy crafting love Sharon xxx

Tuesday 9 December 2014

With love card.

Hello,I thought I'd share this card with you.It's made with the beautiful couture
collection by create and craft. I must confess that these dies are my mother- in-laws.Eileen likes card making,so its nice we share the same interest and crafty stash. This card is layered up in it's simplest form,but there is so much you can do with this versatile collection.      


Enchanted escapes collection.
Beautiful detailed dies.
                           Thank you for stopping by and happy crafting love Sharon xxx

Saturday 6 December 2014

floral card.

Hi there,its so nice to make a different card other then a Christmas card.I had some reddy decoupage flowers made up,so decided to use them on this card.
I matted a purple card on to a lighter purple card,than stuck these on to a A5 base card.I layered various spellbinder dies on top of one another, centralising them on my card, before i stuck them down.I put a double ribbon across the centre behind the white oval die.Then to finish i stuck the decoupage on,a sentiment, bow and pearls
Picture of card.
                   Thanks for stopping by and happy crafting love Sharon xxx.

festive bauble card.

Hi there,just time to fit another Christmas card in,before I send them all out.

I matted red card on to a A5 white card base,then embossed a white background, cut a strip to stamp my sentiment on,then stuck these on to my card.I placed the bauble's on the card with foam pads to left them up.I secured some gold braid from the bauble and up behind the embossed background.A nice easy card.
Picture of card.


Close up of embossed bauble.
Thank for stopping by to read this post and happy crafting love Sharon xxx

Saturday 29 November 2014

stag Christmas card.

Hi there, l have really enjoyed getting my inks out and making lots of backgrounds for my cards.This card is a project made with one of my many background papers. Hope you like it..
To make the card I matted a piece of green embossed card(diamond trellis embossing folder) on to gold pearlized then on to red card.I stuck my mat and layer's on to a A5 kraft card.(A4 folded in half) took tonic studios diamond trellis stripe,cut one out of kraft card then backed it with red card,cut another trellis strip out of my handmade background paper and place it on top of the other,slightly off set to make a shadow.I cut 2 squares from my nesting dies,one out of gold the other out of red then from the background paper i cut the inside die from the diamond trellis and stamped the stags head on to it in black ink.
Assemble the card and finish with a sentiment on kraft card.


Close up photo.

The background is barn door and peeled paint distress inks,sprayed with gold mister and stamped with a script stamp in brown ink.
happy crafting love Sharon xxx

Wednesday 26 November 2014

starry night

Hi there,just finished several Christmas cards this week,so l thought I would share this stamped card with you.
First of all to make the background.l placed a small amount of alcohol inks on my craft sheet and diluted it slightly with blending solution.
I rolled my brayer through the inks picking up all the colours(cranberry and eggplant)rolling it on to glossy card,building up the layers and rolling in different directions to create a pattern,l finished with a spray of silver mister.
I stamped the star across my background with veramark,then embossed with silver embossing powder.
I layered the glossy card on to purple card then on to silver mirror card,this went on to a A6 card,to finish I added a sentiment and square brads
Finished card
Close up of stamped lmage
Thank you for stopping by,if you wish please leave a comment and happy crafting.
                   Love Sharon xxx

Thursday 20 November 2014

Christmas holly card

Hi there another Christmas card finished.This card started out completely different to what I set out to do.I think we all suffer it from time to time when your project dose'nt seem to work out like you wanted it to..I think the end result turned out ok in the end.
I started with a 8x8in square cream card base,matted the Christmas backing paper on to green card then glued to the cream base card.distressing and inking all the edges as I went.the base for my topper measure's l6x11ins.I cut my background paper just slightly smaller than the base,cut a slit half way down the long ways of my paper and curled back the sides to form 2 rolls then glued it down on my base topper.I added a contracting piece of backing paper to the bottom of the topper,so as not to see the join i glued a narrow border and lace over it.
I stuck the topper on at an angle with foam pads to give it height,then added the poinsettias, holly berries and extras to finish off.
Thank you for stopping by to read this page and happy crafting love Sharon.

Friday 14 November 2014

winter christmas tree.


Hi there,loved making this card.I enjoyed making the background.I haven't done any inking techniques for a long time,so this as spurred me on to get my inks out more.I know its more time consuming but it's worth it.
Firstly I started with a 8x8in square card blank,the background is broken China distress ink, I daubed the ink darker in some places but not in others then sprayed a silver mister over the top.The main focal part of the card is embossed with a Christmas tree,inked over the top with broken China to bring the embossing out,then decorated with gems and a sentiment.
 Thank you for stopping by,feel free to leave a comment and happy crafting.

Saturday 8 November 2014

Crafty day out.

Had a Brilliant time at the Hobbycraft show at the NEC at Birmingham.It was nice to see all the crafting celebs and watch the demonstrations.Dean Wilson was presenting the Dreamee girls on the create & craft stand, he was joking and being his funny self, its so nice to be a part of a big crafting family.
Bought lots of crafting goodies,can't wait to start crafting with it,so watch this space.
Thanks and Happy crafting.

Deck the Halls.

Another Christmas card finished,love the colours on this card,very traditional and the boy and girl are so cute
Firstly i used a 8x8in square card blank. I matted and layered the card up first then added a felt bauble,made a messy bow from bakers twine and top with a button.I finished with a topper,gems and a sentiment.
             Thank you for stopping by and happy crafting love Sharon xxx.
Photo of card

Sunday 2 November 2014

Christmas shaker card.

Today made another christmas card. l'm on a roll now, don't know how long it will last?but try to keep it up.
Firstly I started with a 8x8in square card blank. I matted the embossed white card on to blue card then glued on to the base card.The outer snowflake circle punch is from we r memory keepers, the inner ring is embossed with a acetate window and layered on to a glitter circle with foam on a roll,put your shaker bits inside and sandwich together,glue on to your card centrally.Finish with a sentiment,gems and a paperclip.
Thanks for stopping by,please feel free to leave a comment and happy crafting.

Saturday 1 November 2014

Christmas bauble card.

Hope you're had a good week. I've  started making my Christmas cards,thought I'd better start making them seeing there is only 54 shopping days to Christmas (ho dear) better crack on then .
This card looks very norwegian in the  colours I have chosen.The bauble die was free on the front of this months simply cards and paper craft magazine.The card started as a 15x15cm white scallop card blank,the red mat is 14x14cm and the squares are 6.3x6.3cm.Build it up layer on layer, the baubles are on foam pads and the bauble string is a die
Just finish with a sentiment and pearls to decorate.
Thanks for stopping by,feel free to leave a comment and happy crafting.

Thursday 23 October 2014

Dancing card.

Now strictly come dancing is back on our television's .I thought I would make a card with a dancing theme. I used a selection of black and white patterned papers,tonic studios border punch,a stamp with a dancing couple on it,pearl's and a flower.(a nice easy project)
Thank you for stopping by to read this page.Please feel free to comment and Happy Crafting.

Thursday 16 October 2014

Just to say

I have used my fav Tonic Studios Idyllics Die collection again as you can see.I've gone a bit bold with the colours this time,it reminds me of mint and choc ice cream (yum yum) but I think it works?
  The box was made on the Hougie board taking in to account that the Jasmine strip goes across and down your box,so measure accurately.The card has a pop-out front,this was made with the plain die inside the strip die.I attached a 5.5cm x15cm strip behind it,decorate the plain top first,then with the extended strip start at one end and measure at 1.5cm then at 3cm,crease and fold repeat the other end.This should look like a L shape when folded,slot this in to the aperture,stick the first tabs down inside the front of the card.To make it look neat inside,stick a backing card to the front inside of the card,now all their is to do is embellish with pearls and a sentiment.
  Thank you for viewing this page,feel free to comment and happy crafting.
                                                 

Monday 13 October 2014

70th birthday card

This is a card I have made for my special Mum for her 70th birthday.
The card was made with the Jasmine Dream embossing folder and die set,it is such a lovely set to work with and makes the most beautiful cards with no effort.
I've used the Jasmine inside die to decorate the middle,the coordinating embossing folder for the top and bottom of the card.Embellished with silver outline stickers,tonic studio petal pairs and a bow.
                         Please feel free to leave a comment and Happy Crafting.

Wednesday 1 October 2014

Floral Card

I've been busy making quite a few cards with my new tonic studio dies and embossing folders,there are so many different ways to use them.I have lots of ideas to share with you.                       


Firstly this card started with a 8x8'' white scallop card blank. Cut a 7.5x7.5'' square out of peach card, then a 7x7'' square out of white card to find the centre point I measured it in to four equal squares, drew a fine line to match them up,this will be your guideline to put your die on. I took the Jasmine Dream Die set, place the inside edge die centrally in to the first square, then Die-cut it, repeat three times, use your small plain outside oval die to cut the aperture out of the middle. Then die-cut four of the floral inside ovals, emboss if you wish. To put the card together I matted the peach square on to the scallop card, then put foam pads on to the white die-cut square to give it height, stuck it down, then glued the floral inside ovals in to the apertures. I finished off with pearls and a craftwork card sentiment backed on to two peach ovals.
Thank you for viewing this page,please feel free to leave a comment and happy crafting.

Friday 19 September 2014

Happy Birthday Wishes

I sent two cards to Simple cards and Papercraft magazine this is the other one that didn't get published,so I thought I would share it with you.
Firstly l started with a 6x6''kraft card blank,then I cut a piece of striped paper just smaller then the card it's self, from the top of the paper I measured half away across and cut down to the middle of the paper,I rolled back the paper to form a V shape and put a piece of cream lace 3 quarters of away down the paper, then adhered it to my card,I arranged my free floral die-cut flowers on to my card, and stuck  them down with 3D glue. then I stamped a justrite sentiment on to Kraft card then matted on to a piece of card just a shade bigger, put the flower die at either end of the sentiment to decorate, then stuck down with 3D glue, to finish I decorated with buttons and pearls.
Thank you for viewing this page,feel free to comment if you wish,and Happy Crafting.

Wednesday 17 September 2014

For your special day

My first blog entry is a card i sent to Simple cards and Paper craft magazine, which was picked to feature in the Readers Gallery section, this card was made with the free floral die on the front of the previous magazine.

Firstly to make the card I started with a 6x6" scallop card blank.I matted the card front with 2 pieces of coordinating paper, before attaching it to my card i machine stitched around the edge then adhered it to my card blank, then die-cut a border and cut a banner shape out of paper. I machine stitched around it and Stamped a sentiment on to it, then 3D Glued them on to my card. I Cut flowers and leaves from the free floral die and arranged them on to my card, then 3D glued them on to my card. Finally i decorated the centres with buttons and a paperclip on the banner. I really enjoyed making this card and this inspired me to start this blog.

Thank you for viewing this page and Happy Crafting.

Love Sharon x:-)