Wednesday 16 December 2015

Christmas Message.

Hi everyone. Just stopped by to share with all my fellow crafter's out there, this quick and simple last minute Christmas card make. It's also slim enough to fit through the post box, minus the button.
Start with a A5 pearlesent card blank. Cut a piece of Nordic inspired patterned card ( pick and mix payper box ) the same size as the front of the card, before adhering this to the card front, take a length of red ribbon and place it between the two.
Next Adhere a topper to the ribbon, allow it to swing about without attaching to the card. ( I used a glitterments, die-cut sparkling sentiment from docrafts )
Lastly Adhere a button to the top of the topper and cut a fish tail in the ribbon.
Thank you for your company and as always Happy Crafting!
Love SharonXXX:-)


Sunday 13 December 2015

Christmas Poinsettia's

Hi everyone. Only 12 days before Christmas, its flying by. I don't know were the time goes, any way just enough time to post a few more Christmas cards on my blog before l deliver them.
This card came about when I was looking through my card stash and came across lots of stamped poinsettia's l had stamped on to a sheet of card from a borrowed stamp. I decided to make use of it and that was what inspired me to make this card.
Start the card by sprizting a A5 card with a gold mattalic mister, leave to dry, when dry take a oblong die, Cut an aperture into the card front.
Next take a pre cut lattice sheet or if you have a lattice die, cut one from it. Stamp with a script stamp in gold all over the lattice, cut to fit behind the aperture, back gold mirri behind it and adhere to the back of the aperture.
Cut a strip of vellum and stamp a sentiment onto it in black ink, add this to the card.
With my pre stamped poinsettia sheet, cut out and ink up with distress ink ( barn door ) stamp with a script stamp then use gems for the centres.
Make the ribbon leaves by cutting a small length of ribbon, fold over and pleat the edge then with fine wire wrap around it to make it secure on the end make six all together.
Arrange the poinsettia's, ribbon leave's on the card. Use pinflare glue to give the flowers lots of depth and diminish.
To finish it off add two flourishes and a die-cut gold lantern.
Hope you like!
Thanks for stopping by and Happing Crafting to you all.
Love Sharon XXX :-)


Wednesday 9 December 2015

Sledge ride.

Hi everyone. Just stopped by to share my latest card with all my fellow crafter's out there. It's a card idea made with acetate my fav craft material at the minute. It's so versatile you can use it in so many different ways on your projects and they come in some lovely patterns too.

This is how I made the card.. Tilly daydream and friend.
Start with a swing card ( I had some in a pack I had forgotten about the round topper fitted perfectly on the circle ) Next take two pieces of coordinating paper and cover the front half section and the back section of the card ( I used docrafts capsule collection- spots & stripes ) then with a piece of patterned acetate adhere this to the other half of the front  ( in front of the half circle )Cut a strip of paper to cover up the join, where the paper and acetate both meet. Built the decoupage up onto the topper     ( docrafts Tilly daydream A4 die-cut decoupage ) adhere to the scallop circle on the front of the card and then begain to decorate with wooden trees, snowflakes and a sentiment.
I Hope this idea as inspired you to get out your crafty stash and use whatever you have to hand. All my Christmas cards this year have been made from left over card kits etc from last year, so I haven't had to spend a great deal this year on materials, which is always a plus point.
Thanks for stopping by and Happy Crafting!!
Love Sharon XXX :-)


Friday 4 December 2015

Holly Time

Hi there. I thought I would share two cards with you today made from a sheet of toppers from the hobby house.

Card 1.. Festive Fun
Start with a 15cm square scallop card base. Cut different size panels so they fit on the card then matt onto a plain red square of card 14cm square. Adhere to the card front together with baker's twine, a circle and button. Layer the topper onto the card
Die-cut three snowflakes each with a candy in the centre, glitter elements on the topper and cut out a printed sentiment from a polka doodles Christmas cd then finally decorate.

Card 2... Shaker card.
Start with a 15cm square scallop card base. Cut a circle the same size as the shaker dome. Position the matt over the circle and put the circle die back in, take off and run through the die cutting machine. The matt should be in the right place. Next use the same die to cut a circle out of a topper. Lay the matt and topper over the circle Adhere to the card front, pop the dome in from the back of the card. Add sequins and close the dome up with the centre of the topper and a backing paper ( this is quite tricky, trying to keep all of the sequins in the dome and closing it up at the same time. I'm sure there is an easier way that I don't know about ? ) Then finally after all that finish with a wooden star, threaded button and a printed sentiment from a polka doodles christmas cd.
Thanks you for taking the time to read this post and please call again.
Love Sharon XXX:-)


Wednesday 2 December 2015

Winter scene.

Hi everyone. Just stopped by to share 2 Christmas cards with you made from a hunkydory kit. I love the quality of there kits and you can never fail to make a bad card out of them.
Card 1..
Start with a 15x15cm card. Take a corner punch round the 2 outer corners. Place the lattice die (tonic) in the the centre of the card and die cut it out. Cut a piece of background card slightly less then the card and round the outer corners, adhere to the Inside of the card. Place foam tape on the topper and adhere to the centre of the card and decorate with purple gems
Card 2..
Start with a C6 card. Mount a piece of  backing card onto silver mirri board, then Leave to one side. Make up the decoupage winter scence and mount onto a piece of silver mirri, adhere to the prepared matts. Cut a piece of printed acetate wider then the card ( taking into account of the decoupage ) leaving enough on either side to fold (roughly 1cm on each side) dome it over the matt and layered winter scence and with strong tape adhere to the back. Mount onto the card base. I like the idea of the acetate covering the scene and its so easy to achieve with little effect.
Thank you for your company and Happy Crafting.
Love Sharon XXX:-)


Friday 27 November 2015

Skating

Hi there. I wanted to share this card with you all today. Its a traditional Christmas card based loosely on a idea i saw on Pinterest but I have adapted it to suit my project.
Start with a 14.5x 14.5cm card then cut a piece of spotty paper 14x14cm distress the edges of the paper then ink the edges, wrap some lace around first before adhering to the card base, then with a piece of contrasting paper in the pack (dovecraft. Back to Basic Christmas vintage, which I have used through out the card) cut a piece measuring 7x13cm distress round the edges then ink the edges adhere to the card on the left hand side. Cut three circles two in patterned paper and one in kraft card, arrange them with the two smallest behind the large one adhere to the card. Ink the skate's, bow and firs adhere to the card and add a sentiment. Ho I nearly forgot the pearl on the bow to finish off. I hope its inspired you
Thank you for calling and visit again soon
Love Sharon xx:-)

Wednesday 25 November 2015

Spinner card.

Hello there. Just stopped by to share this quick and simple spinner card with you all today. I love the colour purple so today's card is made from different tones of my fav colour. I think silver and white look nice with it too.
Start with a A5 white card. Use a circle die to cut out the front of the card. Create a frame to go round the circle with the same circle die and a larger scallop edge die. Adhere this to the card front
The bauble toppers are from kanban, pop 2 out from the sheet and sandwich them together with a length of nylon thread in between. Adhere to the back of the circle making sure it is suspended centrally. To hide the mess on the back cover with a piece of coordinating paper. Cut a bow ( I used a template and embossed it with a star folder and inked the edges ) Adhere to the card and top with a sparkly jewel
On the inside adhere a fancy die cut circle and finish off with die cut sentiment underneath the bauble. Hope you like it!!


Thank you for your company and Happy Crafting!!
Love Sharon xx:-)

Sunday 22 November 2015

Merry and Bright.

Hi there. I thought I'd share this clean and simple Christmas card with you all today. It's quite quick to achieve with not alot of material's all you need is an embossing folder, card, a few embellishments and of course glitter
Start with a 8x8in card blank. Matt and layer a piece of pale blue card and silver card on to the base. Take a piece of white pearlesent card, emboss through the bauble folder and cut it to fit the card. Emboss again with the folder, but cut only the outer and middle baubles out. Glitter the baubles. Mount on foam pads to give the baubles dimension and adhere over the matching embossed bauble on the card. Decorate all the baubles with a bow then a pearl and for extra impact decorate the middle one with a charm. To finish stamp a message in the bottom right hand corner. I like the clean look of this card and the added embellishments set it off. Hope I have inspired you a little.


Thanks for your company and please call in again. Love Sharon Xxx:-)

Tuesday 17 November 2015

Woodland fox.

Hi there. Thought I'd share this quick & simple card with you all today. It's a card I have put together with different bits & bobs I have found in my craft stash, which we all have hanging around just waiting to found the right card to put them on.
I started the project firstly with a 15x15cm base card. I embossed, inked and cut a piece of kraft card 14x14cm. Matt onto the base card and cut, ink and emboss a frame 12x12cm. Mount centrally onto the card with foam pads, with a fox stamp ink onto card. (I used one of the leaf backgrounds I had prepared previously from my autunm leaf cards. I thought it might be fun to stamp the fox onto it. ) position it onto the left hand side on foam pads. Glue leaves behind and a button on each leaf.
Stamp just for you on a strip of white card backed onto a strip of black card, tuck under the frame and over at the end, trim with bakers twine. To finish add a friend banner (craft asylum) and there you go the card finished.
Thanks for calling in and join me soon for another card to hopefully inspire you.
Love Sharon xx:-)


Saturday 14 November 2015

Autumn leaves.

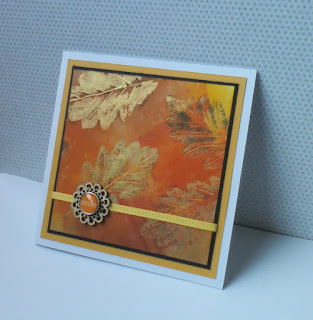
Hi there. I thought I'd share this collection of autumn inspired cards with you, as promised in my last post. These were achieved in the same way as my last card entry, apart from using the brayer to criss cross through the card. Also there are slight changes to the materials, due to experimenting a little with paint effects.
Its a fun technique to try out and especially at this time of year when the colours are so vibrant.


  Thank you for your company and please pop in again.
  Love Sharon xx:-)

Thursday 12 November 2015

Autumn leaves ( inking technique.)

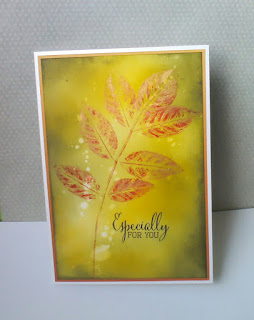
Hi there. I'm glad to be back from a long crafty break and can't wait to showcase my card ideas again. This card is a simple inking technique from a craft magazine I saw and thought it was a good technique to try out.
This is how i made the background...
I cut a piece of square white card out first. I prefer to work on a larger piece of card when i am working on a background and cut it down to size afterwards to fit my card base. I applied various distress inks (mustard seed and rusty hinge) to the card, blending the colour's into one another. Then flicked water onto the top to give it a bleached look. (which doesn't seem to be as noticeable on this card) with a fresh leaf (vein side prominent) brayer a darker distress ink (peeled paint) over it. I Positioned the leaf ink side down onto my inked card and with a piece of copy paper burnish it to print the leaf, repeat several times to make a pattern. When dry I used my drayer full of ink (barn door) to give it a criss cross effect though it. Finally with metallic gold acrylic paint, over burnish on top of the leaf impression. Allow to dry again. Cut to 12x12cm, mat and layer on to a 14.5x14.5cm base card and decorate accordingly.
I have made lots of different samples using this technique. I would love to share these with you in my next blog entry.
Thanks for calling in and see you soon
Love Sharon xx:-)


Thursday 24 September 2015

Reindeer shaker card.

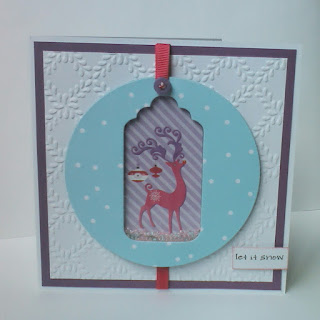
Hi there. I wanted to share this contemperary shaker card with you, made from a free gift on the front of papercraft essentials. ( issue 100) Featured in the magazine there is a project similar to the one I have made. I love the idea of incorporating the tag die and topper (free gift) together to make a shaker card.
They are so popular at the minute, the variations are endless...
Try one today you will be amazed!!!

Thank you for calling in and Happy Crafting.
Love Sharon xx:-)


Thursday 17 September 2015

It's cold outside.

Hi there. I've been busy making a few Christmas cards over the last weekend and haven't had time to post any until now.
This is a different idea to use with your decoupage, if you happen to have a nice winter inside or outside scene to hand. This inside scene looks lovely behind this window and the additional tree at the front gives it added interest outside too!
Hope you like it!!
Thank you for calling in and Happy Crafting!!
Love Sharon x:-)


Friday 11 September 2015

Summer treats.

Hi there. Are you enjoying this mini heat wave we are are having, its not set to last any longer, so holding on to this nice weather I decided to make this summer inspired card.
The papers, buttons and sentiment are from craft asylum. They are from the meadow sweet collection, these are my favourite go to stash. I love the colours in this range, they are so fresh and on trend.
The Lollypops are decorative buttons brought separately in a packet called 'summer treats' hence the name of this card. They match perfectly with the papers and embellishments.
As you can see in the photos the card is very simple to achieve and ideal for a quick make...


Thank you for calling in and Happy Crafting!!
Love Sharon xx :-)


Tuesday 8 September 2015

Sweet little girl.

Hi there. Thought I'd share this quick and simple make with you today. The plain peach and spotty backing papers are from a 8x8 first edition pad called 'blank canvas' and the circle topper in the centre is from hobby house. (I love hobby house toppers, the characters are so cute.)
This is just a brief description of how I made the card ...I cut a blue scallop oval, attached it to the background layout, before I put the banner on. I cut a white fancy circle, which I cut in half and tucked behind the banner and in front of the blue oval. Then to finish i attached the topper on to the banner.
A very easy project to make. Hope you like it!!

Thank you for calling in and happy Crafting!!

Love Sharon x:-)


Monday 31 August 2015

Birthday Boy.

Hi there. Thought I'd share this nautical inspired card with you today. The topper as you may recognise is from Lili of the valley. (This is from one of the old style topper sheets, now they come in book form which is really handy) I matted it onto black cardstock and attached it to my prepared background.
The circle twine frame that surrounds the birthday sentiment is created by cutting an outer and inner circle to foam a ring, with 2 colours of bakers twine wind the first colour a little then change to the second colour, securing the first thread under the second so it doesn't come undone while changing the twine. repeat this over and over again until the end and secure the thread to the back.
The twine button in the middle was made by applying double sided tape to a cardstock circle, from the middle coil the bakers twine outwards then secure the end to the back. (You could also start from the edge of the circle, if you wish and wind it in to the middle it doesn't matter ) the boat that the little boy is holding as glossy essents on it and finally I tucked the 'just for you' behind the 'birthday boy' sentiment as shown. I hope you like it!!

Thanks for calling in and happy Crafting!!

Love Sharon x:-)


Friday 28 August 2015

Shaker card.

Hi there. Thought I'd share this simple shaker card with you today...
I started with a 6x6 scallop white card, next I chose a pale pink card and a coordinating background paper to match, which l matted and layred on to my card. The next step is to cut an aperture in the centre of the base card with a nesting circle die, with the next die up in the nesting circle die set cut 2 out of clear acetate, then stick foam on a roll around one of the circles, before sandwiching your acetate circles together put the shaker bits in first. (I used die cut flowers and leaves in pink and green to keep to the same colour scheme as my card) The thickness of the foam is important because it needs to be quite thick so your shakers inside move freely instead of sticking together in a mess.( I am guilty of the same trick!!) When this is assembled stick it over the aperture with some red sticky tape, then pop a scallop frame over it to finish it off. I chose to put a little bird perched on the side looking in.( I thought it went well with the design of the card) then last of all I stamped a sentiment in black ink . I wish i had backed the sentiment onto white card because its quite hard to see on the photo but never mind...  I think thats all for now!

Thank you for calling in and happy Crafting!!

Love Sharon x:-)


Sunday 23 August 2015

Wedding exploding box.

Hi there. I thought I'd share this exploding box with you today. I made it for my nieces wedding day. The cake in the middle took some working out, but i managed it in the end with some trial and error. As you can see l decorated it with cream lace, added pearls around every tier and cascaded peach flowers and leaves down one side of the cake.
This box isn't dissimilar to the other exploding box I made in a previous entry on my blog. I have used some of the same elements but changed the colour and added the cake. The ring on the top of the box and the horseshoes came from a cake and craft shop which i thought brought the whole effect together and made the box look very special for a wedding. I think they are lovely to give as a gift for a special occasion, it certainly made my nieces day!!

I think that's all for know until next time thanks for looking in!!

Love Sharon x:-)